

Best Turkey Gravy Recipe Made from Drippings
Table of Contents
Have you ever wondered what separates an ordinary Thanksgiving dinner from a truly memorable feast? The secret often lies in the gravy! A rich, silky turkey gravy recipe with drippings transforms plain turkey and mashed potatoes into a celebration-worthy meal. Today, I’m sharing my foolproof method for creating the most flavorful homemade turkey gravy, no lumps gravy that will have your guests raving.
Using the drippings from your roasted turkey not only reduces waste but also captures incredible depth of flavor that store-bought options simply can’t match. Let’s dive into this classic recipe that’s been perfected over generations of holiday dinners.
Ingredients List
- Drippings from one roasted turkey (approximately 2-3 cups)
- 4 tablespoons unsalted butter
- 1/3 cup all-purpose flour
- 2-3 cups turkey or chicken broth (low-sodium preferred)
- 1/2 teaspoon dried thyme
- 1/4 teaspoon garlic powder
- Salt and freshly ground black pepper, to taste
- 1 tablespoon heavy cream (optional, adds richness)
- 1 teaspoon soy sauce (optional, adds color and umami)
Substitutions: For gluten-free gravy, replace all-purpose flour with cornstarch (2-3 tablespoons). Vegetable broth can be used instead of turkey broth for a lighter flavor profile.
Timing
- Prep time: 5 minutes
- Cooking time: 15 minutes
- Total time: 20 minutes
This quick preparation allows you to make fresh gravy while your turkey rests, saving you the 45-60 minutes typically needed for traditional gravy recipes that require simmering bones for stock.
Step-by-Step Instructions
Step 1: Collect and Prepare the Drippings
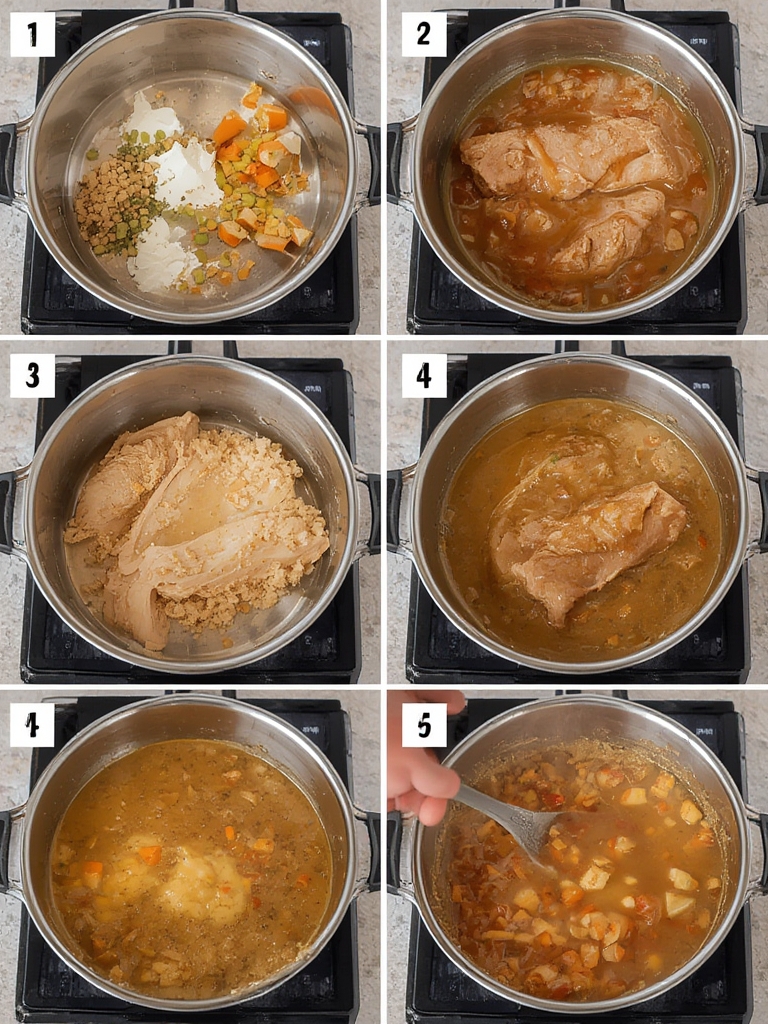
Remove the roasted turkey from its roasting pan and set aside to rest. Pour all drippings into a fat separator or large measuring cup. Let stand for 5 minutes to allow the fat to rise to the top. Skim off 1/4 cup of the fat and reserve the remaining flavorful liquid.
Pro Tip: Don’t have a fat separator? Place the drippings in the freezer for 10 minutes – the fat will begin to solidify on top for easy removal.
Step 2: Create the Roux
In a medium saucepan over medium heat, melt the butter. Add the reserved turkey fat (or use all butter if preferred). Sprinkle in the flour while whisking continuously. Cook for 2-3 minutes until the mixture turns golden brown and smells nutty.
Technique Tip: Keep whisking constantly during this step to prevent burning and ensure your gravy remains free of lumps.
Step 3: Add Liquids and Seasonings
Gradually whisk in the reserved drippings and broth, adding about 1/2 cup at a time. This slow addition is crucial for preventing lumps. Add thyme, garlic powder, salt, and pepper. Bring to a gentle simmer.
Step 4: Simmer and Reduce
Allow the gravy to simmer for 5-7 minutes, stirring occasionally, until it reaches your desired thickness. Add the optional cream and soy sauce during the last minute of cooking.
Nutritional Information
Per 1/4 cup serving:
- Calories: 65
- Protein: 2g
- Carbohydrates: 3g
- Fat: 5g
- Fiber: 0g
- Sodium: 120mg (varies based on broth used)
Healthier Alternatives for the Recipe
- Lower-fat option: Skip the cream and use only 2 tablespoons of butter
- Reduced-sodium version: Use unsalted broth and adjust seasoning to taste
- Dairy-free alternative: Use olive oil instead of butter and skip the cream
- Gluten-free version: Substitute cornstarch for flour (mix with cold water first)
Serving Suggestions
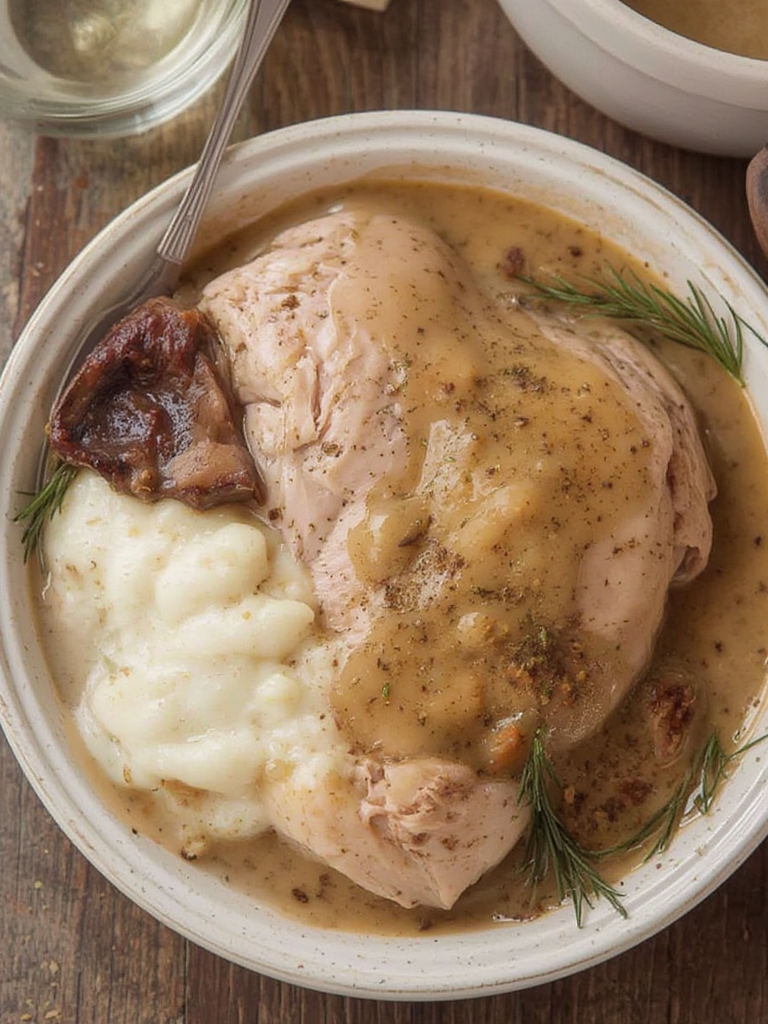
Serve this luxurious gravy in a warmed gravy boat alongside sliced turkey, mashed potatoes, and stuffing. For an elegant presentation, drizzle lightly over plated turkey and garnish with fresh thyme sprigs. This gravy also pairs wonderfully with roasted vegetables or as a savory topping for open-faced turkey sandwiches the next day.
Common Mistakes to Avoid
- Rushing the roux: Don’t skip cooking the flour mixture – raw flour taste ruins gravy
- Adding liquid too quickly: This causes lumps that are difficult to remove
- Underseasoning: Taste before serving, as drippings vary in saltiness
- Overcooking: Extended simmering can make gravy too thick and intense
Storing Tips for the Recipe
Refrigerate leftover gravy in an airtight container for up to 3 days. To reheat, warm gently on the stovetop with a splash of broth to restore consistency. This gravy also freezes well for up to 3 months – perfect for meal prep or preserving leftover holiday flavors.
Conclusion
Mastering this classic turkey gravy recipe with drippings will elevate your holiday meals and comfort food dinners alike. The rich, savory flavor simply can’t be replicated with packet mixes or jarred alternatives. What’s your favorite dish to smother with homemade gravy? Try this recipe at your next gathering and let me know how it transforms your meal!
FAQs
Can I make this gravy ahead of time?
Yes! Prepare it up to 2 days in advance and refrigerate. Reheat gently on the stovetop, adding a splash of broth if needed to adjust consistency.
How do I fix lumpy gravy?
Strain it through a fine mesh sieve or blend with an immersion blender for a smooth consistency.
What if I don’t have enough drippings?
Supplement with good-quality store-bought broth and add a teaspoon of Better Than Bouillon for enhanced flavor.
Can I make this without turkey drippings?
Yes, though you’ll lose some flavor. Substitute with butter and high-quality broth, adding a teaspoon of soy sauce for color and depth.
How do I know when my gravy is thick enough?
It should coat the back of a spoon and leave a clear path when you run your finger through it.